How To Get Chrome OS for PC and Mac


Chrome OS for PC

Chrome OS for PC: If you’re a regular visitor to this website, you will know how misguiding is this article is titled. Chrome OS is made exclusively for Chromebook. End of the story. However, it’s still possible to install Chromium OS (an OS built from the same stone as Chrome OS) on your PC or Mac. This article will guide you how to get Chromium OS for PC.

But, why?

Just like Chrome OS, Chromium is an ultra lightweight operating system designed just enough to fulfill your online computing needs. Pay attention when I said online, ’cause honestly, without any internet connection, Chromium OS (and Chrome OS)is just like a cool car running out of gas.

What you need:

  • Chromium ISO
  • A USB disk

Read this to learn more about Chrome OS history.

What to do:


  • Download Chromium ISO from Neverware.
  • Create a Chromium installation Live USB using Chromebook Recovery Utility. You can get this tool by installing Chrome web browser.
  • Choose Use Local Image instead of choosing your computer model.
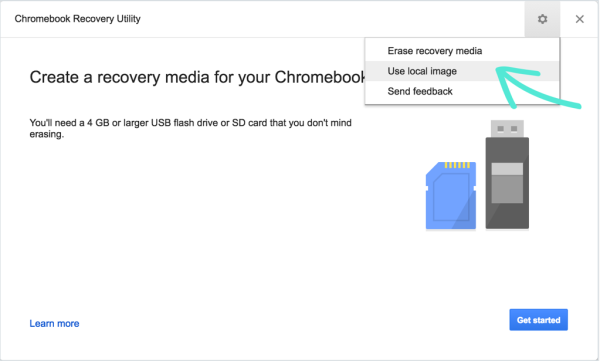
  • Navigate to the Chromium installer we just downloaded.
  • Click Get Started.
  • Grab a coffee and watch some movies.
  • Turn your PC off and boot it from BIOS.
  • Set your startup disk so your next startup will be using the Live USB you just made earlier.
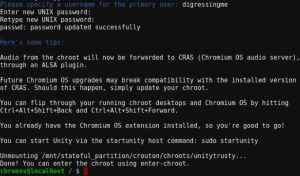
  • Follow the on-screen instruction.
  • Don’t forget to unplug your Live USB before restarting. Chrome will make it obvious to you.

TIPS: Don’t use ZIP for making the Live USB, but use BIN instead. Get Bin by extracting the ZIP file.

Here is why:


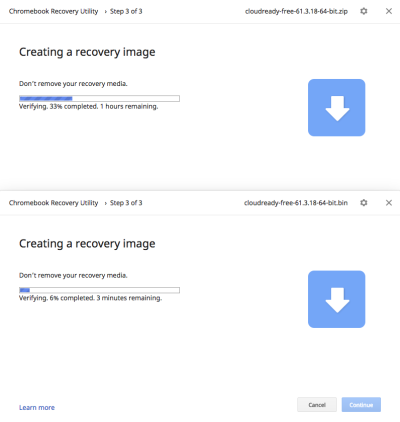
<— This one uses .ZIP.


<— and this one using BIN started hours later. FML.


That’s it! You’re ready to go.

Next Steps:

Like Chrome OS, you will have to log in using your Google Account and then check the following tutorials I made for Chrome OS:

  1. Customizing Tab.
  2. Installing extensions.

Some might work and some other might not even accessible.

Read this to learn more about Chromium.

A Mac user?

Read this article for installing Chromium OS on your MacBook Air.


The Result

Your PC with the new fresh Chromium installation will behave like “normal” Chromebox, only without auto- update. But you can join the community and pay for a small amount of money to get a full life support for your Chromium PC. And that’s interesting.

So, what do you think about this OS? Is it better than just opening Chrome web browser on our laptop? Let me know in the comment below.

Here Is Why Crouton Is So Awesome on My Chromebook


Here Is Why Crouton Is So Awesome on My Chromebook

I used Crouton to install Linux on my Chromebook, and I’m using it again as I write this article. The installation is running on another tab of the Chrome web browser I’m using to write now. Here Is Why Crouton Is So Awesome on My Chromebook:

Also, read Earlier Crouton installation.

What Is Crouton?

Crouton is the acronym of Chromium OS Universal Chroot Environment. It is a set of scripts that bundle up into an easy-to-use, Chromium OS-centric chroot generator. Thre fore it allows us to install Linux within the Chrome and run it after. So, Chroot means CHromium ROOTs(?).

Installing Crouton

Installing Crouton itself is easy as long as you have all the sources. And like I mentioned earlier, it’s running on the same web browser I’m currently using. So, reading your reference as it’s installing will be very easy.

But, turning your Chromebook to developer mode is quite tricky and boring. So, please be patient with this process, ’cause I almost slam my Chromebook to the wall for my lack of knowledge and patience.

You can read the step by step tutorial here and then come back here to install other OS (I was using Gallium on that page).

Or, you can continue by following these steps (after making your Chromebook in developer mode):

  1. First, you will have to download Crouton.
  2. Then press ctrl + alt + T to open the new tab
  3. Type shell on the Terminal
  4. The prompt will be Chronoslocalhost
  5. Type  sudo sh ~/Downloads/crouton -t keyboard,extension,unity -r trusty -n unitytrusty
  6. Just wait until the installation finished and don’t close the tab!
  7. In the end, enter your username and set your password (twice). Pay attention to “twice”, it means you have to enter the same password two times.
  8. After it’s done, you can start using your Linux unity by typing sudo startunity on the terminal.

Why Crouton Is So Awesome on My Chromebook?

If what I’ve just explained to you is still not enough, what if I tell you that:

  • I can easily install other Linux using the same process only by writing different command line.
  • I don’t have to risk my data by accidentally formatting my drive.
  • I can cycle through Chromium OS and your running graphical chroots using Ctrl+Alt+Shift+Back and Ctrl+Alt+Shift+Forward.
  • Chrome OS and Linux installed by Crouton can share the same clipboard.

Great sources: https://gist.github.com/garthvh/07805317032ce7d55887

Cara Bikin Macbook Air Jadul (2009) Keren Lagi


Kalo lu punya waktu panjang, gw ga bakal langsung bahas cara bikin Macbook Air jadul (2009) keren lagi. Tapi gw bakal ceritain dulu kenapa gw beli ini… Nah, jadi ga penasaran kan?

Awal gw liat unit ini, gw cuma mikir satu kata, “mewah!”

Gimana ga mewah? Bagian dari seperangkat alat gaya yang fungsinya ga ngelebihin netbook harganya bisa beda tipis sama iMac yg gw pake buat banting tulang maen Zuma!?!

Fungsinya dulu…ya gitu2 aja. Apalagi sekarang? Tapi ada yg abadi dari unit ini, yaitu tongkrongannya. Beli Macbook Air, casingin yg cakep terus nongkrong sok menikmati suasana di cafe, jangan lupa bawa kamera digital kaya Nex-5, biar retro gitu.

Nah, sekarang ke bagian tipsnya! Ada beberapa metode yang bisa lu coba:

1. Metode Pertama : Striped Raid

Yang lu butuhin adalah :

  1. 1 atau lebih ssd 1.8 inch
  2. Obang kembeng
  3. Cabang usb merk Orico
  4. Hdd docking Orico juga
  5. 1 atau lebih flashdisk yg rada gedean

Eh…obeng kembangnya ga usah ding. Tadinya gw mau ganti hdd yg di dalem, taunya gagal gara2 yg gw beli tuh ssd 1.8 buat IBM.

Ga usah gw ulang kan daftar kebutuhannya? Tinggal lu apus.

Yang mau kita lakukan adalah… Tancapkan semua flashdisk dan docking hdd (beserta ssdnya) ke lobang usb Orico, terus tancepin ke port usb Macbook Air yang cuman 1. Baru sadar ya kenapa butuh beli Orico?

Selanjutnya kita bakal ngikutin langkah-langkah bikin RAID.

  1. Pencet command dan spacebar
  2. Ketik diskutil
  3. Disc Utility terbuka
  4. Pilih ssd yang ada di kiri
  5. Pilih tab RAID
  6. Beri nama RAIDnya, pilih striped
  7. Tarik flashdisk ke bawah pilihan tadi
  8. Pilih tombol bikinnya.
  9. Nama RAIDlu bakal muncul di desktop
  10. Iseng restart
  11. Jajal aplikasi yang biasanya berat

Berhasil kan? Macbook Air kamu jadi keren lagi.

Sambil bawa2 sebanyak ini ke kafe? Lu malu? Ini style steampunk maaaan!

2. Metode Kedua : Langsung ganti hardisk

Kalo lu termasuk yang beruntung bisa dapetin SSD 1.8″ buat Macbook Air, rekomendasi gw sih yang OWC AORA, lu tinggal kopi datalu pake Carbon Copy Cloner terus pasang kopiannya ke Macbook Airlu.

Begitu distart, lu masuk ke sistem sama persis sama punyalu. Tapi jauh lebih ngebut!

3. Metode Ketiga : Instalin Chrome Os Cloudready Neverware (Failed!)


Gw ga rekomen metode ini, lantaran Macbook Air 2009 ini ga bisa detect wifi. Tau sendiri kan kalo Chromebook tanpa internet itu lebih ga berguna daripada pasak dalam tempurung?

Tapi kalo lu bisa aktifin wifinya, gw pengen banget tau!

Sebagai solusi penghiburnya, gw installin Windows 7 Ultimate, installin drivernya dari Bootcamp yang bisa lu download gratis, dan ga gw instalin aplikasi apa-apa kecuali Google Chrome. Jadilah Chromebook jadi-jadian.

4. Metode Keempat : Tukar tambah sama yang baru.

Gampang kok caranya, tinggal masukin ke toko-toko online aja. Tapi yang jujur ya, soalnya sekarang banyak penipu. Jadi penjual jujur kaya kita kena imbasnya… Dulu juga banyak sih.

5. Cobain installin MACOSX Lion 32bit. Gw udah coba, dengan cara yang ga ribet juga. Hasilnyas Macbook Air lebih lumayanlah dipakenya.