The Best Web Browser Extensions Complete Tutorial


The Best Web Browser Extensions: Running a function to open a site is no longer the only requirement that is run by a web browser. Many functions that must be offered by a web browser to be selected by potential users. Web browsers are always expected to be able to quickly display the contents of a website intended by users. In addition, the web browser is also expected to perform other functions previously performed by other applications outside the web browser.

However, speed vs. function is two opposite things. In any common scenario, the addition of functions will slow down the performance of the web browser. Except for Internet Explorer, which ironically the first web browser that introduced the use of extensions but worsened its performance.

Here Come The Extensions

Fortunately, most popular browsers allow us to add the specific function to the browser we’re using by installing add-ons. That is what we now call as extensions. Extension or plugin is an add-on that we can embed in the web browser. With the extension, we can choose only the functions we need. This causes the web browser that we use does not have to come fully equipped with the functions that most of us never even use.

Browsers built from the same root will not be discussed here. For example, Chromium will certainly use the same extension (not apps) as Chrome, Firefox Nightly will be the same as Firefox, and so on.


How To Pick The Extensions

Extensions have similar sensitivities just as other software. Sometimes it can be very annoying. Instead of making your browsing experience more productive, it’s making your browser slow and renders your web browser unusable. Based on that, browser developers tend to use their own extension center (but that alone can still get away from curation). It leaves us with the option to choose your own pick to use according to how trusted the extension developer is.

There is an easy way to presume the extension either good or bad. Look at the ads they make. I believe you have capable eyes to distinguish which ads are professionally made with the ads I created using only screenshots and screen recorders.

Good ad means good extension. Well, at least the ad indicates that the extension shown is still well maintained. You love giving feedback, don’t you?

Check the ads below:

…and compare it to this one I made:


You know which one is better before even trying it, right?


The Best Web Browser Extensions For Me Are:

  1. Google Translate
  2. Grammarly
  3. Last Pass
  4. Black Menu
  5. Hotspot Shield
  6. Screencastify & Fireshot
  7. Evernote

Read the complete Chromebook Extensions for Productivity here.

  • Google Translate

I’m writing my articles in English, then GTranslate and Lingotek translate my article into other languages. It’s crucial for me to keep my writing understandable in other languages as well.

Read hear about blog translation.

  • Grammarly

I always type in recklessly, there’s always an error when I do. And that includes grammar mistakes. Often I do not believe in writing, so I let Grammarly disclose my mistakes. And I can highlight a word if I feel my writing is less varied and Grammarly will advise me the synonyms of the word.

  • Last Pass

Last Pass is a must-have web browser extension for a forgetful person like myself. It stores many passwords in one place and across devices.This allows me to switch to any web browser and to my other devices seamlessly. And, this will also help people with the trust issue. Never, never save your password on your web browser!

  • Black Menu

Best Web Browser Extensions

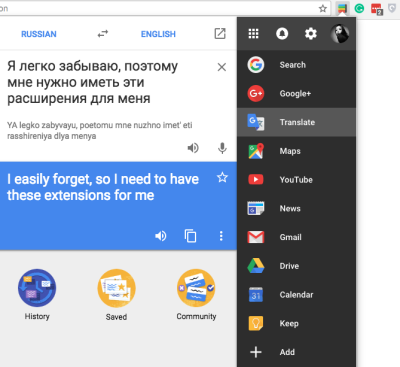
Black Menu puts all Google related apps into its nicely designed extension. I can do multitasking without even have to leave my browser.

  • Hotspot Shield

Also for the security and unblocking many sites, Hotspot Shield never turns me down.

Read this article to see how Hotspot Shield can keep your browsing experience safe.

  • Screencastify & Fireshot

I use both to capture my desktop screen. Screencastify is a decent screen recorder that can record your desktop with the result of the unbelievably small sized file (not dimension or quality). As for Fireshot, it can scroll capturing the webpage I’m using, resulting in a nice seamless portrait image.

You can check the result I made for uTorrent article here

  • Evernote

Evernote becomes beneficial when I’m collecting reference data and information for my next article. It’s more than just for taking notes, it can also be your personal mail sorter (thank’s to its new function). I’m also using it to put my notes to continue in Blogo as an article. And do you know that its logo is an elephant, the best mammal in memory?


We will be discussing some of these extension stores in our conversation soon:

  • Chrome
  • Yandex
  • Firefox
  • Safari
  • Maxthon
  • Vivaldi

Also, read about all 15 web browsers comparison.

Chrome Web Browser Extensions

You can go to Chrome Web Store (which according to my perspective is the most sophisticated web browser store) by clicking on the Apps menu on your Chrome web browser and choose Chrome Web Store from the icons shown on the next page.

The complete version of Chrome Web Store shipped together with any Chromebook unit, with the addition of Apps and Games section. As for other Chrome web browser installation, it comes with Extensions and Themes, and in some cases, extensions only.

Read here to know more about Chromebook, Chromebox and all in the Chrome family (translator needed).


Let’s Talk About Yandex Web Browser Extensions

Yandex’s extension center can be found by typing browser://tune/ in Yandex’s search bar. Yandex has more than 1500 extensions* available.

It has Turbo Data Compression by default, I’ve been playing with it a bit and never had a slight of weird behavior.

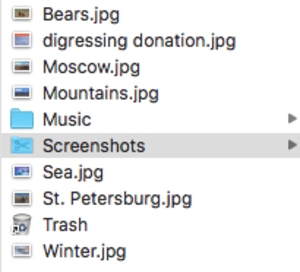
The coolest thing about Yandex is the Yandex disk that allows us to treat this web browser as a personal computer. By default, Yandex Disk will give us wallpapers (and of course with bears), Music and Screenshots folder, and Trash.All of them will be synced to all of our devices running Yandex.Disk.

Yandex also comes with Anti Shocking, Ad Blocking, Flash Content Blocking to increase your safety and browsing speed.

*For even more extensions, you can install Opera’s extensions by getting it here.

I really look forward to Yandex to follow Chrome’s path with its Chromebook (If they ever will).


Firefox Web Browser Extensions

Can be spelled out if Firefox is the pioneer in this extension jobs. It’s one of a few web browser that successfully integrated the extensions into use. Since its first appearance, the new Firefox made a massive update lately. And this causes a lot of obsolete extensions that can no longer be used in the latest Firefox, Quantum. Firefox already declared this thing will come to the developer two years ahead.

We can see the available extensions by going here.

I have a good news for you if you’re a Chrome user who just can’t live without your favorite Chrome extensions. You can install your Chrome extension by following the instruction below:

The next video will show you how you can use Chrome extensions in Firefox:


Safari Web Browser Extensions

Safari is an exclusive web browser for Apple devices. Luckily, it’s not the only web browser we can use on our Apple devices even I have nothing to complain about Safari. And like any other Apple’s products, Safari extensions can be found on its AppStore. We can see the list here.

What I do not like about the Safari extension center is the poorly given info about the extension. So we need to really install it to find out what it does. After all, despite being featured coolly in the App Store (like all Apple products), the placement of the extension mixes with other apps. And, does not Apple’s search engine have any cleverness like the others to be able to display … for example, wouldn’t it be convenient if we typed MarsEdit and it will automatically give us the results for Mars Edit?


Maxthon Web Browser Extensions

I had difficulties logging in to it extension site, even after resetting my password (that’s why I need my Last Pass). Apparently, the issue was on their side. I have to go to extension.maxthon.cn since its no longer under the same maintenance with maxthon.com. The language is written in Chinese and I didn’t have any translator installed on Maxthon yet. So, I reviewed Mathon side by side with Chrome like so:

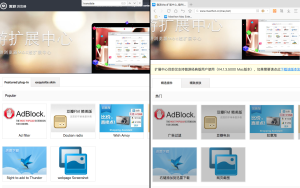
The easiest way for me to test Maxthon’s extensions was by using the classic version of it (Maxthon 4). I really hope they will fix this pointless issue soon.

Also, read more about Maxthon here.


Vivaldi Web Browser Extensions

Vivaldi comes with limited extensions but is neatly curated. If you want to add a new extension into Vivaldi, you can use the Chrome extension as well.

It was a bit of a shock to me that I thought Vivaldi would use the Opera extension. But, again I have nothing to complain about.

What Is Chromebook, Chrome Themes, and Google Chrome Update


In this post, we will talk about, “What Is Chromebook, Chrome Themes, and Google Chrome Update?”

Chromebook is a Linux laptop, running on the ultra-lightweight operating system called Chrome OS. Sounds familiar? Of course, because this is the sibling of Chrome web browser we’ve been using for about a decade now.

Read more about the history of Chromebook here.

But, why?

Have you ever used a laptop with 8GB memory, 1GB graphics card, and 3TB of storage media just for doing office work?

Maybe the answer is, yes! That’s if you work in an advertising company or post-production house. If not … imagine how many laptop resources been wasted while using the laptop just to send an email and other tasks that deal with the internet.

The average price of Chromebooks is below the price of laptops in general, and of course is well below the price of the MacBook Pro.This is possible because Chromebooks have a specific target, the internet user. Therefore, the Chromebook is also equipped with a specification that is only fitting for it. Plus, Chrome OS is so light, allowing Chromebooks to run with just 2GB of RAM and 64GB of storage. Thanks to the use of SSDs here. For those who like to dismantle pairs of laptops, Chromebook allows for upgraded both memory and storage.

The storage is very limited in size, but that shouldn’t be a problem since we store everything on Google Drive.

[edsanimate_start entry_animation_type= “bounceInLeft” entry_delay= “0” entry_duration= “0.5” entry_timing= “cubic-bezier(0.55, 0.085, 0.68, 0.53)” exit_animation_type= “bounceOutRight” exit_delay= “0” exit_duration= “0.5” exit_timing= “cubic-bezier(0.165, 0.84, 0.44, 1)” animation_repeat= “1” keep= “yes” animate_on= “scroll” scroll_offset= “75” custom_css_class= “”]

[edsanimate_end]

Let me describe what we can access/put in the cloud:

  • Mail —> GMail
  • Storage —> Google Drive
  • Documents —> Google Docs and also accessible through Drive
  • Videos —> YouTube

For more serious (or rich) users, Chromebooks are also manufactured with higher specifications at a relatively cheaper price. Chromebooks include everything for free out of the box, and you can add paid apps if you want via Chrome Web Store.

Read about Chrome Web Store here.

amzn_assoc_placement = “adunit0”;
amzn_assoc_search_bar = “true”;
amzn_assoc_tracking_id = “digressingme-20”;
amzn_assoc_search_bar_position = “bottom”;
amzn_assoc_ad_mode = “search”;
amzn_assoc_ad_type = “smart”;
amzn_assoc_marketplace = “amazon”;
amzn_assoc_region = “US”;
amzn_assoc_title = “My recommendation:”;
amzn_assoc_default_search_phrase = “Chromebook”;
amzn_assoc_default_category = “All”;
amzn_assoc_linkid = “6f412e4739f1e14633a3387ea002d23e”;

//z-na.amazon-adsystem.com/widgets/onejs?MarketPlace=US

Chrome Themes

Almost 99% of my activities on Chromebooks are in the Chrome browser. There is almost no time to see my desktop wallpaper. So I have to minimize Google Web Browser to see my wallpaper.

Read more about Themes here.

No matter how my surfing activities, over time it will become boring because it should always look at a blank screen that is only decorated with text. That’s why I feel the need to customize my Chrome web browser by going to Chrome Web Store and choose the theme I want. There is a wedge for me, the “theme that works cool” was found in the extension category.

Read about how to make and sell web apps on Chrome Web Store.

Google Chrome Update

Chrome regularly sending updates to improve both Chromebooks and Chrome Web Browser. It’s available in three categories, stable, beta and dev. Stable is for casual user while Beta is Google’s experiment, glitch expected. Developer mode, on the other hand, lets the user do massive tweaking, included replacing the Chrome OS to other operating systems.

This is the luxury of Chromebook user that Chromium users don’t have.

Read more about Chromium here.

chromebook

Membuat dan Menjual App Chrome di Chrome Web Store


Membuat dan Menjual Aplikasi Chrome di Chrome Web Store Plus Panduan Instalasi Gallium OS (Linux) di Chromebook

Alangkah kagetnya gw waktu coba-coba bikin app buat Chromebook dan malah ngeliat ternyata gw udah bikin dua aplikasi Chromebook di situ. Senenglah pastinya, sayangnya gw ga inget langkah-langkah buat bikinnya. Dan ternyata dua aplikasi itu adalah proyek coba-coba gw yang terbengkalai. Kasian yah?

Makanya sekarang gw mau tulis ini sebagai catatan gw pribadi juga kali aja nanti lupa lagi. Tapi biasanya sih, gw malah lupa pernah nyatet.

Hal ini terjadi juga saat gw ngurusin Adsense gw yang modar gara-gara fitur baru plugin yang gw pakai. Dan akhirnya gw putuskan buat nyatet step by stepnya di kertas aja. Lagian kalau nyatet di atap kan gak sampe, sob! Memang cara tradisional masih lebih ampuh, kecuali kalau kertasnya hilang juga.

Balik ke soal aplikasi ini… tapi sebelumnya gw mau jelasin dulu tiga hal ini:

  1. Chromebook
  2. Chrome Web Store
  3. Aplikasi Chrome

Chromebook

amzn_assoc_placement = “adunit0”;
amzn_assoc_tracking_id = “digressingme-20”;
amzn_assoc_ad_mode = “search”;
amzn_assoc_ad_type = “smart”;
amzn_assoc_marketplace = “amazon”;
amzn_assoc_region = “US”;
amzn_assoc_title = “Pilihan Kekinian”;
amzn_assoc_default_search_phrase = “Chromebook”;
amzn_assoc_default_category = “All”;
amzn_assoc_linkid = “2d610ae15631270f0e1e481c141212a8”;
amzn_assoc_rows = “4”;
amzn_assoc_design = “text_links”;

//z-na.amazon-adsystem.com/widgets/onejs?MarketPlace=US

Pengalaman pertama kali gw adalah menggunakan Chromebook Acer C720P. Kesan pertama yang gw dapetin adalah… wow asik nih. Asiknya adalah:

  • Bobot ringan
  • Batre awet
  • Gak ribet sama virus
  • Boot awalnya cepet
  • Aplikasi gratisannya seabrek
  • Bisa dual boot

Saking ringannya, Chromebook sering gw jadiin powerbank buat ditumpangin sama adik-adiknya (hape dan tablet). Ya ini juga lantaran batre doi juga awet banget. Jadi settingan gw adalah masangin tablet buat koneksi internet, dan si Chromebook jadi suplier dayanya. Uuu… simbiosis mutualisme nih!

Virus sih ga jadi urusan kita lagi lantaran semua diatur sama Google secara online. Nah, ini kelebihan Chromebook dibanding netbook atau laptop Windows lainnya. Kalau di kedua perangkat yg barusan gw sebutin kan kita ribet sama berbagai notif anti virus.

Boot awalnya cepet banget, sekitar tujuh detik kalau menurut stikernya sih. Yg gw rasain malah lebih cepet lagi. Pokoknya keluwesan kita mengakses data di Chromebook itu sama kaya kita mengakses data di handphone.

Aplikasi gratisannya banyak banget. Walaupun gak semewah App Store, tapi semua app ini juga dijamin bebas virus, walaupun ada aja yang kesannya asal bikin dan bikin browser kita jadi jelek.

Buat ngakalin kinerjanya yang hampir 80% harus online, selain pake aplikasi offline, kita juga bisa install Linux* di Chromebook kita.

*Untuk tulisan lebih lengkap seputar instalasi Linux ini ada di bagian paling bawah postingan ini.

Chrome Web Store

Semua aplikasi yang kita butuhin sehari-hari ada di sini. Mulai dari kebutuhan mengetik sampai kebutuhan edit video. Semua dikerjakan secara online juga. Bayangin asiknya lu ngedit di kamar tidur, terus ngelanjutin di teras depan rumah. Eh, itu sih deket ya?

Buat yang jengah sama aplikasi Microsoft Office yang berbayat, bisa pakai aplikasi yang disediain Google secara gratis. Kerennya lagi, file yang kita bikin di situ bisa dipakai secara penuh sama temen kita yang cukup beruntung bisa beli Office. Contohnya gw tulis di poin selanjutnya…

Aplikasi Chrome

Sebagai pengganti Words, kita bisa pakai Docs, sementara untuk pengganti Excel kita bisa pakai Sheets. Gimana buat yang buka edit foto? Ada Pixlr yang keren dan Polar. Untuk video juga ada, cuma gw belum nemu gratisan yang bagus, kalau yang gratisan lumayan banyak.

Aplikasi Chrome berkesinambungan sama akun Google kita, makanya kita bisa pindah-pindah perangkat dan mengakses data kita di mana aja.Semua file disimpan di Google Drive, dan juga bisa multi login. Ya selama ga lupa password dan username aja. Itu sih kaya gw yang marah-marah ngira akun gw dibajak padahal gw lupa semalam udah ganti password.

Lalu bagaimana berbagai aplikasi itu bisa ada di Chrome Web Store? Tentunya mereka gak muncul secara tiba-tiba. Ada orang-orang yang mengunggah aplikasi buatan mereka ke sana. Kabar baiknya adalah… Kita juga bisa!

Membuat dan Menjual Aplikasi Chrome

Kali ini gw mau membahas pembuatan aplikasi Chrome tanpa perlu pengetahuan coding. Yang kita perlu adalah:

  • Akun Google.
  • Akun WordPress.com.
  • Self hosted domain.
  • Koneksi internet <— juga terpakai untuk instalasi Linux (OOT).

Bagaimana caranya? Gw lanjutin tar abis bangun tidur yah…

Hoahm… gw bangun setelah tidur yang kurang dari dua jam dan mendapati Chromebook ini sudah terinstall Gallium OS. Yes!… topik baru!

Balik ke pembuatan aplikasi…

Akun Google

Gw hampir ga percaya sampai harus bahas poin ini. Kalau lu pengguna Android, hampir bisa dipastiin kalau lu punya akun Google. Kalau belum atau mau ulang dari awal, bisa langsung ke sini buat lihat caranya. Saran gw sih, dari awal pakai data diri sebenar-benarnya. Kenapa? Karena nanti kita bakal urus masalah pembayaran pakai akun ini juga. Lu ga mau dapet pembayaran buat Brad Pitt tapi ga bisa diambil lantaran nama aslilu adalah Si Otong, kan?

Akun WordPress.com

Kenapa WordPress dan bukan yang lain? Sederhana sih alasannya… lantaran gw cuma bisa pakai ini! Udah deh ga usah berisik, bikin aja akun WordPress lalu bikin dulu desain awalnya. Kalau gak ngerti urusan desain, bisa pakai template-template keren yang ada di sini dan di sini.

Baca juga artikel “tema wordpress keren” dan “lima tema WordPress profesional dan keren“.

Self Hosted Domain

Self hosted domain adalah tempat di mana lu bakal naro alamat web yang mau dijadiin aplikasi Chromebook. Lah, kan udah ada WordPress?!? Nah ini cara hematnya biar kita ga usah beli hosting mahal-mahal. Sederhananya begini: WordPress itu buat kita naro file, self hosted domain buat kita pasang nama, misalnya “SiOtong.com”.

Nih coba pakai layanan rekomendasi gw di bawah ini:

Di Dracoola.com, kita bisa dapet paket menarik dan layanan customer service-nya yang tabah mandraguna. Jadi kalau ada pertanyaan tekhnis, tanya sama mas-mas di sana aja ya.

Setelah urusan domain selesai, install WordPress di web yang barusan kita bikin. Jangan lupa install Jetpack dan konekin ke akun WordPress.com yang sebelumnya kita bikin biar makin eksis. Ini memungkinkan kita buat update website dan otomatis tersebar ke berbagai sosmed yang terhubung ke Jetpack WordPress.

Koneksi Internet

Ini wajib banget, jadi pastiin quota cukup buat menunaikan tugas ini sampai selesai. Bukan apa-apa, tar kalo putus di tengah jalan terus lupa stepnya udah sampe mana kan repot.

Mulai Membuat Aplikasi

1. Buat Icon App

Anggaplah kita mau bikin web app bernama SIOTONG. Pertama-tama kita harus membuat icon aplikasi berukuran 128x128px dalam format .png. Gak tahu gimana caranya atau gak punya aplikasi penyuntingan gambar? Bikin secara online aja di Logo Creator. Save logo tadi dengan nama icon_128.png ke folder yang kita namain SIOTONG.

youidraw

Editor online Logo Creator by YouIdraw

2. Setelah itu buat file text yang berisi:

{
“name”: “SIOTONG“,
“description”: “ISI DENGAN 132 KARAKTER PENJELASAN APLIKASI INI“,
“version”: “1.0.0”,
“manifest_version”: 2,
“icons”: {
“128”: “icon_128.png”
},
“app”: {
“urls”: [
“http://SIOTONG/”
],
“launch”: {
“web_url”: “http://SIOTONG/”
}
}
}

Ganti semua huruf yang ditulis tebal dengan keterangan sesuai aplikasi yang kita bikin lalu simpan ke folder SIOTONG yang tadi kita masukkan logo dengan nama manifest.json <— ekstensi/akhiran harus .json, jangan sampai jadi .json.txt atau yang lain.

3. Zip Folder SIOTONG yang berisi file icon_128.png dan manifest.json.

4. Ketik chrome://extensions di Google Chrome. Lalu centang kolom “developer mode“. Pilih load unpacked extension buat mulai mengunggah file SIOTONG.zip yang kita buat di proses nomer 3 dan pilih folder Web App.

5. Chrome bakal nunjukin kesalahan yang perlu diperbaiki. Baik yah?

Menjual Aplikasi Kita

Nah, di langkah inilah akun Google yang sebelumnya kita buat berperan. Hal pertama yang harus kita lakukan adalah masuk ke web Developer Chrome dan masukkan akun Google kita di sana.

  1. Buat file zip
  2. Buat akun developer
  3. Upload (file zip) app <— kita sudah sampai sini.
  4. Pilih sistem pembayaran <— Masukin info keuangan seperti kartu kredit atau rekening bank (Swift Code BCA = CENAIDJA). Pengguna Telkomsel juga bisa bayar pakai pulsa.
  5. Selesaikan kode app <— ikuti petunjuk dari Chrome Web Store.
  6. Dapatkan app ID
  7. Dapatkan token OAuth
  8. Selesaikan App <— proses copas sana-sini dari poin 6 dan 7.
  9. Beri kelengkapan “toko kita” <— masukin gambar dan video dalam ukuran yang sudah ditentuin.
  10. Bayar biaya pendaftaran <— waktu gw nulis ini biayanya 5USD.
  11. Luncurkan app kita!

Nah, sampai sini sih rasanya isiannya sudah beda-beda tergantung selera dan kebutuhan kita. Yang jelas kita harus masukin gambar resolusi tinggi dan beberapa yang beresolusi rendah. Kalau bingung cara bikin desain yang “menjual”, coba pakai Adobe Spark deh.

*Bonus stage: Instalasi Linux Gallium OS di Chromebook

Lihat lebih detail di http://www.digressingme.cool

Jadi semalam gw bergadang lagi karena ada artinya. Akhirnya berhasil juga install Gallium OS di Chromebook Acer C720P.

Proses instalasi:

1. Download file di https://galliumos.org/download <— kalau mau clean install.
2. Ikuti petunjuk instalasi di https://wiki.galliumos.org/Installing
3. Khusus Acer C720P bisa lihat di https://wiki.galliumos.org/Installing/Peppy

Pastiin buat mengunduh file yang sesuai dengan Chromebook yang kita pakai. Gw belum pernah cobain gimana kalau install pakai OS yang gak disarankan sih. Cobain gih… tar hasilnya tulis di komen yah. 😀

Proses Instalasi

  1. Buat backup Chromebook pakai Chromebook Recovery Utility (buat jaga-jaga aja).
  2. Ubah Chromebook jadi Developer Mode (Jangan hidupkan debugging mode!).
  3. Matiin total Chromebooknya.
  4. Pencet dan tahan tombol ctrl + (panah kanan di atas / kalau di keyboard biasa = F2) lalu tekan tombol power buat nyalain.
  5. Pencet ctrl + alt + t buat buka terminal.
  6. Bakal muncul tampilan dengan command prompt crosh, ketik shell lalu pencet enter.
  7. Ketikkan: sudo crossystem dev_boot_usb=1 dev_boot_legacy=1
  8. Ikuti proses sampai restart ke Chrome lagi, lalu sambungkan ke internet.
Instalasi CHRX

Gw pilih cara instalasi pakai chrx soalnya bikin gw bisa milih mau masuk ke Chrome OS atau Gallium OS. Coba cek di daftar perangkat yang kompatibel buat ngeliat apa Chromebook yang kita pakai bisa menggunakan metode (instalasi chrx) ini.

Ikuti panduan instalasi chrx untuk proses mendetail, berikut ini adalah rangkumannya:

  1. Siapkan Chromebook kita untuk proses instalasi mengikuti cara di atas atau lihat di sini
  2.  untuk detailnya.
  3. Boot perangkat ke Chrome OS tanpa login, dan konek ke internet. <— kita di sini.
  4. Ubah jadi tampilan terminal dengan cara Ctrl+Alt+F2(panah kanan), lalu masuk sebagai chronos dengan mengabaikan password <— ini gunanya tidak mengaktifkan debugging mode. Saat debugging mode aktif, gw selalu ketemu masalah Password Salah!
  5. Ketik chrx: curl -O https://chrx.org/go && sh go (lihat dokumentasi chrx untuk pilihan lainnya)
  6. Ikuti petunjuk untuk membuat partisi SSD yang akan diisi instalasi GalliumOS. Kalau ini pertama kalinya menjalankan chrx di Chromebook, chrx akan reboot setelah melakukan partisi dan kita harus mengulang langkah ke-5 (curl -O https://chrx.org/go && sh go).
  7. Bersabar sambil nunggu instalasi selesai dan berharap koneksi internet baik-baik saja.
  8. Setelah restart, di layar “OS verification is OFF“, tekan Ctrl+L untuk masuk ke GalliumOS, atau Ctrl+D untuk masuk ke ChromeOS.

Setelah beberapa waktu coba-coba, mulailah gw gatel mau nambahin aplikasi. Dan baru gw sadar bahwa gw ga tahu cara install aplikasinya. Untung gw nemu tutorial ini. Walhasil sekarang sudah terinstall aplikasi-aplikasi yang bisa ikut menunjang produktifitas kita.

Nah, gimana? Cukup berguna kan buat menghabiskan waktu? Yuk diikutin terus webnya…


youidraw

YouiDraw Logo Creator Untuk Bikin Desain di Chromebook


YouiDraw Logo Creator Untuk Bikin Desain Logo di Chromebook

YouiDraw sangat berguna buat lu yang suka bikin desain di perjalanan, atau lebih tepatnya di perjalanan dengan akses internet. Karena aplikasi ini berbasis web (bener gak ini istilahnya?), maka matilah dia kalau kita coba gunakan pada saat offline. Setidaknya itu yang gw rasain sejak nemu aplikasi ini di Chrome Web Store.

Kesan pertama kali waktu gw buka aplikasi ini adalah, “wow mewah”

youidraw

Tampilan awal menampilkan Tips atau petunjuk penggunaan YouiDraw.

youidraw

Dilengkapi dengan banyak pilihan template buat memulai desain logo. Terus terang, begitu gw buka aplikasi ini, gw jadi lupa sama pedoman KISS (Keep It Simple, Stupid). Jadi gw cobain semua kemungkinan yang bisa dibikin pakai aplikasi ini.

youidraw

Seperti bisa dilihat, gw nemuin aplikasi ini waktu Googling dengan kata cari “png logo design”. Kebetulan gw lagi misahin web ini yang tadinya ditebengin sama web rtdiSoho buat Google Adsense. Dan salah satunya yaitu dengan bebenah akun YouTube gw yang lama banget gak terurus. Saking gak terurusnya, sampai-sampai gw gak sadar kalau Digressingme gak punya logo (kasian yah? Jangan!).

Cara Pakainya Dengan Sekilas

youidraw

Di kanan bawah ada pilihan buat ngisi objek yang lagi lu kerjain, ada tiga pilihan, yaitu:

  • Gradient (gradasi)
  • Simple (solid)
  • Artistic (efek-efekan)

Jadi misalnya lu mau bikin tulisanlu jadi berbagai gaya, di bagian tadi tempatnya.

youidraw

Di sini bisa kelihatan kalau gw mulai bikin logo dengan cara milih template yang ada lalu merubah elemen dalam template itu dengan objek yang udah disediakan sama YouiDraw. Sesudah merubah objek, baru gw ganti fill sesuai selera (gradasi/solid/efek).

youidraw

Elemen yang ada di dalam kanvas desain ditampilkan di paling bawah. Kelihatan kan kalau di desain ini gw pakai bentuk hati dan plus, garis, tulisan “igressingme”, D kapital dan slogan.

youidraw

Di bagian atas ada perkakas buat bikin desainlu makin ciamik. Wah, udah kaya aplikasi Adobe Illustrator aja ada perkakas untuk bolean (modif dua bentuk jadi satu).

youidraw

Kalau tiba-tiba bingung mau ngapain, tombol Tips di kanan atas bisa lu klik setiap saat buat ngasih bantuan. Walau emang sih gak nolong-nolong banget. Jangan manja dong ah.

youidraw

Setelah selesai bikin desain, lu bisa simpen hasil desain dalam empat pilihan format (SVG, PDF, PNG dan JPEG).

youidraw

Lalu apa yang bakal disave? Pilihannya adalah:

  • Entire canvas (seluruh bidang kerja)
  • All Objects (Semua obyek dengan menyisakan transparansi [untuk PNG])
  • Selected Objects (Hanya objek yang terpilih)

Jadi, misalnya gw kebetulan cuma memilih logo mark hati, maka yang tersimpan hanya ada di hatimyu.

YouiDraw Logo Creator

YouiDraw Logo Creator

Ke mana file bakal disimpan? Kita bisa menghubungkan Google Drive, Dropbox, YouiDraw dan media penyimpanan lokal kita dengan cara klik tombol “Choose Drive” dan login ke akun-akun penyimpanan cloud kita tersebut. Keren banget banget deh, gw aja dengan noraknya terkaget-kaget waktu iseng pencet hotkeys cmd-S dan ternyata bisa ngesave hahaha… Kampungan!

youidraw

Nah, ini asiknya.. lu cuma bisa export tanpa menyertakan watermark adalah dengan cara membuat akun premium seperti Adobe Spark dan aplikasi keren lainnya. Buat gw sih gak masalah ya, gw lebih pilih usung label app gratisan daripada ngebajak. Karena kita semua ujung-ujungnya perlu makan kan? :p

Buat tutorial lebih mendalam, bisa langsung klik blog app ini.

Oke deh, semoga artikel ini bisa bikin kesibukan baru buat kalian para magerers.


might and magic heroes online

Might and Magic Heroes Online Solusi Multiplayer Beda OS


Might and Magic

Jadi nih sob…ceritanya dari kemaren ini gw pengen banget maen game multiplayer sama yayang gw. Ehtapi… gw pake Macbook Pro yang jalanin Sierra, sementara doi pake Hp Elitebook yang jalanin Windows 10.

Ya jadi rada ribet aja sih buat gw yang sangat sangat punya keterbatasan soal networking. Taunya cuma masukin username dan password terus konek ke internet.

Belom lagi cari game apa yang bisa dimaenin di dua OS berbeda ini. Gw mau cobain Skyrim, eh beda versi terus kadang konek kadang kagak. Mau cobain Diablo 2 (request doi), eh buat Sierra udah gak support kecuali gw pake Boot Camp. Ada game di AppStore yang kayanya seru, eh di Store doi gak ada.

Dan solusinya… Might and Magic Heroes Online!

Singkat cerita… kenapa gw ga jadi orang jujur aja pake fasilitas dan maenin game yang bukan bajakan sekaligus? Gw coba-cobalah nyari di Chrome Web Store. Ya namanya Chrome Web Store, ga pandang bulu gw jalanin pake OS apa, ya tetep bisa jalanlah.

Ketemulah game ini… Might and Magic Heroes Online! Langsung install di dua laptop kami. Dan langsung mulai multiplayer deh. Oh iya, buat maenin game ini, lu perlu ngijinin browserlu untuk ngejalanin Flash. Kalo lu udah nginstall Flash tapi belum jalan juga, coba lu ijinkan dulu web game ini di settingan Chromelu. Caranya? Pasti banyak deh yang jago jelasin ginian di jagad Google ini. Kalo buat di Mac sih, ke Preferences, lalu gw search “flash”, cari allow…terus gw tambahin alamat web game ini. Mungkin berlaku juga buat game-game lain ya sob.

Game ini sih asik, grafiknya ya ala-ala Might and Magic pada umumnya, pertarungannya pun tetap turn based. Ya udah, gw lanjutin dulu deh, baru level 2.

//pagead2.googlesyndication.com/pagead/js/adsbygoogle.js

(adsbygoogle = window.adsbygoogle || []).push({});

chrome web store

Chrome Web Store


Sebetulnya gw tuh pengen banget punya Google Chromebook. Padahal alesannya juga ga jelas kenapa. “Just for the sake of owning it!”, kalo kata salah satu orang kolektor gitar yang gw pernah temui. Pernah sih cobain install Chromium OS di laptop lama, dan ya memang rasanya cuma kaya buka laptop yang isinya browser Google Chrome aja sih. Lah, terus gimana kalau mau install-install dan kerja? Nah, di situlah fungsi Chrome Web Store.

Apa aja yang ada di dalam Chrome Web Store?

Di sini lu bisa temuin aplikasi, game, extension dan tema yang ga ngeganggu kinerjalu sebagai karyawan maupun pengangguran. Jiah…nganggur aja pake Chromebook, gaya lu ah!

Buat yang pemakai aplikasi Microsoft Office, ga perlu takut ga bisa lanjutin kerja. Soalnya app dari Google bisa ngerjain itu semua. Misalnya, untuk File Excel, bisa dikerjain pake Google Sheet, File Words bisa dikerjain pake Docs dan gw belom cobain sih yang laen. Soalnya gw bukan fans aplikasi Office sih dari dulu, makanya gw ga pinter-pinter.

Buat alay yang mau bikin tampilan Chrome jadi khas… tinggal download tema aja. Keren-keren pilihannya. Gw sih pake tema Pacific Rim Uprising…gagah!

Nah, buat yang mau lebih serius, bisa install macam-macam extension…mulai dari extension penerjemah, sosial media dll. Jadi lu bisa tetap exist tanpa harus ningalin halaman kerjalu.

Oh iya… asiknya lagi. Kalo pake ini, lu ga perlu panik file lu ilang. Soalnya semua otomatis masuk ke Google Drive yang waktu gw tulis ini sih masih dikasih gratis cuma-cuma sebesar 30gb (kalo lu beli Chromebook, bukan install Chromium OS doang). Wuih lumayan tuh.

Yang gila tampil, janga lupa loh kalo dari dulu Google tuh udah punya Youtube, terus sekarang ada yang namanya Sites… itu buat bikin websitelu, ya kali lu mau pasang foto-foto narsislu beserta kata2 mutiara di situ. Lu ga perlu ribet masuk-masukin fotolu ke hape atau mana-mana, soalnya semua foto bahkan videolu itu otomatis terbackup di Goofle Photos. Unlimited quota (dengan kualitas medium).

//pagead2.googlesyndication.com/pagead/js/adsbygoogle.js

(adsbygoogle = window.adsbygoogle || []).push({});

Nah Ini Asiknya…

Perasaan serius melulu… gak ada game? Wew.. ada dong cong… Di sini banyak game yang bisa lu maenin online dan offline. Ya tinggal klik aja di pilihannya, mau cari yg available offline juga gak? Jangan sampe udah download, tau2 pas di dasar laut ga bisa lu maenin lantaran ga ada sinyal.

Tapi ini bukanya ga ada cela yah.

Nomer satu tetaplah : Mayoritas kegiatanlu di sini musti ONLINE. Minimal lu musti santai dulu sampe nemu sinyal baru bisa lanjutin pake app yg online only tadi. bahkan untuk ngesave data pun begitu.

Nomer dua : Namanya store… ada aja kecolonganya. Bahkan sekelas AppStore atau PlayStore kita suka nemu developer dodol yang ngupload remehan gak bermutu. Apalagi di sini… beberapa kali gw nemu “cloningan” game yang pas gw install ternyata masuh ke phishing web. Norak!

Kabar bonus bahagianya adalah : Sebagian Chromebook udah bisa jalanin app Android. Jadi lu yg galau mau beli apaan dengan budget terbatas, gw saranin beli Chromebook yang udah bisa jalanin app Androidnya. Harganya relatif lebih murah kok.

Nah gitu dulu deh… kalo ada yang mau nambahin, mendingan jangan.

Bikin tulisan sendiri aja gih. Tentang Chrome Web Store lagi juga boleh kok. Ok? Ok?

Oh iya… ngiklan nih… baca dong cerita sedih gw di sini. Dijamin signan.

Aku Di Bumi Datar

Klik gambarnya, jangan didiemin aja!