
Here Is Why Crouton Is So Awesome on My Chromebook
I used Crouton to install Linux on my Chromebook, and I’m using it again as I write this article. The installation is running on another tab of the Chrome web browser I’m using to write now. Here Is Why Crouton Is So Awesome on My Chromebook:
Also, read Earlier Crouton installation.
What Is Crouton?
Crouton is the acronym of Chromium OS Universal Chroot Environment. It is a set of scripts that bundle up into an easy-to-use, Chromium OS-centric chroot generator. Thre fore it allows us to install Linux within the Chrome and run it after. So, Chroot means CHromium ROOTs(?).
Installing Crouton
Installing Crouton itself is easy as long as you have all the sources. And like I mentioned earlier, it’s running on the same web browser I’m currently using. So, reading your reference as it’s installing will be very easy.
But, turning your Chromebook to developer mode is quite tricky and boring. So, please be patient with this process, ’cause I almost slam my Chromebook to the wall for my lack of knowledge and patience.
You can read the step by step tutorial here and then come back here to install other OS (I was using Gallium on that page).
Or, you can continue by following these steps (after making your Chromebook in developer mode):
- First, you will have to download Crouton.
- Then press ctrl + alt + T to open the new tab
- Type shell on the Terminal
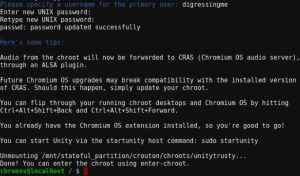
- The prompt will be Chronoslocalhost
- Type
sudo sh ~/Downloads/crouton -t keyboard,extension,unity -r trusty -n unitytrusty - Just wait until the installation finished and don’t close the tab!
- In the end, enter your username and set your password (twice). Pay attention to “twice”, it means you have to enter the same password two times.
- After it’s done, you can start using your Linux unity by typing sudo startunity on the terminal.
Why Crouton Is So Awesome on My Chromebook?
If what I’ve just explained to you is still not enough, what if I tell you that:
- I can easily install other Linux using the same process only by writing different command line.
- I don’t have to risk my data by accidentally formatting my drive.
- I can cycle through Chromium OS and your running graphical chroots using Ctrl+Alt+Shift+Back and Ctrl+Alt+Shift+Forward.
- Chrome OS and Linux installed by Crouton can share the same clipboard.
Great sources: https://gist.github.com/garthvh/07805317032ce7d55887


