WordPress and its plugins are two inseparable components. While WordPress itself does just great as a CMS, its plugins (including third parties) empowered it with so many functions without the need for coding and programming knowledge. Even sometimes I have to admit that coding/programming knowledge will make my job easier and skip the hassle of waiting for the troubleshooting solution form the vendor. This page talks about WordPress Plugins to animate your Wordpress site.
How to make your WordPress website more appealing to your visitor? Visually speaking, you can animate it. Yes, I also thought that having animation on WordPress is impossible. But, actually, it’s possible. Thank’s (again) to the developer of the plugin who did their great job making these plugins.
Animate It
“Animate It” is a plugin to animate your page elements, such as text and pictures. The limit is your own creativity. After installing the plugin, it will appear on the top of your post/page WordPress text editor. After you click the button, Animate It will show you the user-friend setting.
In the setting area, you can decide what kind of animation you will use when the object enters the page, and what to choose when the object exit the page, and what to trigger the animation. The option is simple, but I think that will cover all our need, such as hover, scroll, and load. This is the video showing Animate It in action. I actually got this video when I asked about some setting to the developer.
A very quick response!
This is how Animate It bounce the object on your page:
Unlike Animate It that focus on animating objects, Elementor is a great site builder that allows you to embed many things on your WordPress page, and that includes animation. You can put animation you get from YouTube or the one you made yourself on Adobe Spark by simply inserting it on your page.
If you think that there’s no point doing this because you can easily put your animation on your web by default… Well, Elementor allows you to nest your animation on a specific area you want your animation to appear. Elementor will override your page’s alignment setting. Cool, huh?
Youtube and WordPress are two famous names from different worlds. YouTube has its own hardcore fans that can give a famous YouTuber millions of subscribers. Imagine that. On the other hand, WordPress as the world well-known CMS has given birth to millions of Blogger (well, this part is a bit awkward since Blogger actually is on a different team). Anyway, can you imagine if you can combine them both and have the best of both worlds? A WordPress YouTube!
If you ever visit my Movies Site, then you might notice that none of the videos are actually hosted on my site. Why? Because it will make my site weightless. A video in current video format with current standard plausible quality is around 1 to 6 Gigabytes. My current plan on Namecheap is 20 Gigabytes. Imagine how many sacrifices do I have to make in order to keep this web online while keep adding more videos to my site? Don’t believe me? Believe the numbers… 20 divided by 6 equals to 3,3folowing by many 3s enough for Siri to make a beatbox song! Too bad I have ZERO references (pun intended).
Cool, right? the video you just watched also taken from YouTube. After all, it’s “legal”. I added the punctuation because, by legal, I meant that the original poster also gets benefit everytime someone watched this video.
What If I’m a Greedy Bastard?
Well, that will make the both of us. This is the list of what you need to do:
I will be surprised if you haven’t got one already. If you already have a Gmail or Google account, that means you already have a YouTube account. Try opening YouTube with your Gmail account. Then, follow this to-do list:
Make a video, any video.
Post it on YouTube
Put it on your WordPress YouTube website<— just name it like this for now.
1. Make Any Video
You might realize that YouTube’s billions watchers are varied in ethnicity and likes. Even someone wearing makeups has been watched hundreds of times! Just make any video you like, it might become your WordPress YouTube niche later. Who knows?
2. Post It On YouTube
You might want to make a post-processing to your video before uploading it to YouTube to make your video more appealing. Cut all unneeded part, put yourself as the watcher. A kitten is cute, but displaying a kitten for 30 seconds will be boring unless it’s for the additional purpose of your audio track. but that’s kinda beat the purpose, don’t you think? If you’re a Linux user, you can try Pitivi, if you’re a Mac and Android user, there are tons of selection for it.
As the finishing touch, you might want to try Adobe Spark. You can also use Adobe Spark to decorate your YouTube channel.
Then, work your way around to post it on YouTube. Don’t forget to add the related tags and set your language right. My suggestion is to set your YouTube to the same language your WordPress in.
3. Put It On Your WordPress YouTube website
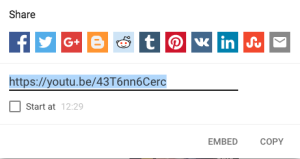
We don’t need any plugin to do this task. You can simply click the share button on your video and you can see two tabs there: EMBED and COPY. Both do similar task creating “something” to put on your WordPress YouTube website (or anywhere).
Just read along and don’t do anything until you get my punchline (I do this mistake a lot, copying from a tutorial).
Copy simply give you a shortened video URL so you can easily share it to any platform that only allows a limited amount of characters such as Twitter (but you can share easily to Twitter using the Twitter sharing button under the video). In this example, the video URL is: https://youtu.be/43T6nn6Cerc
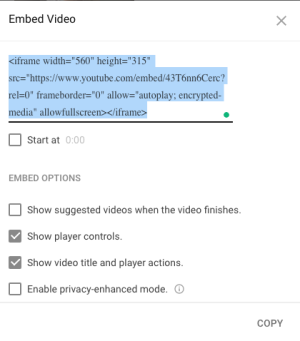
Embed gives you more control, let me paste the same video code for you:
Both will lead you to the same video but we use it in two different manners. I won’t send
just merely to show my friend the video. It will make both me and my friends look dumb. And most likely my friend would ask me, “WTF are you sending me?”. So I’ll have to send https://youtu.be/43T6nn6Cerc instead.
Embed code, gives us iFrame, a well-known method to put a frame on the HTML page. Non-CMS (Content Management Service) users used this a lot because unlike CMS, plain HTML doesn’t show container and material style layout. We won’t cover this. This will also give us more control over the video.
Let me describe them:
iframe width=”560″ height=”315″ This tells us the video dimension. It’s 560 pixels wide and 315 pixels tall. We can freely change this to suit our need.
frameborder=”0″ allow=”autoplay; encrypted-media” allowfullscreen This line tells us if we want to use a border or not, allow autoplay or not, and other settings we can set from the Embed Tab.
Here is your Punchline!
Copy everything here.
Go to your WordPress post or create a new one
Switch from Visual to Text
Paste the code there
Switch back to visual or directly make a preview
You can make the video appear in the center of the post by adding <center> before the code and </center> after the code.
In my case, it would be:
<center>
</center>
Boost It Even More!
These are some Plugins you should install!
WP Movie Library
IMDB Connector
Woo Commerce
Budy Press
WP Movie Library is WordPress plugin that enables you to make a movie database in seconds, just like IMDB. No more searching, copy and pasting. Even the promotional posters and other suggestion are also included.
IMDB Movie Connector gives you the placeable widget to put on your homepage, showing movie poster and synopsis.
Woo Commerce, you need to install this if you want to start your online store. Read more here.
Buddy Press, allows you to make a list of your returning fans database.
I Think that’s all for starting your own WordPress Youtube website. See you!
We will cover on How To Start Making Money From WordPress Website on the next session. So, stay tuned by following this website. Just hit the red bell on the lower right.


 Let me describe them: